The Art of Preparing OSv Packages
In this post we introduce the Microservice Demo Application and demonstrate how to run it locally, e.g. in your development environment. This is the first part of a three-part blog post. The other parts in this series will be:
- The Microservice Demo Application (Running Inside OSv Unikernels Locally)
- The Microservice Demo Application (Running Inside OSv Unikernels On Kubernetes)
Introduction
Application osv-microservice-demo serves for demonstration purposes of the improvements made to OSv and Capstan in the MIKELANGELO project. OSv is an operating system designed specifically for lightweight cloud workloads. It’s been developed initially by Cloudius Systems, now ScyllaDB. Capstan is a tool for rapidly composing applications into self-contained virtual machines ready to be deployed to various virtual machine monitors.
Application Services
The application consists of five specialised microservices, each responsible for its own task. The application allows users to upload photos, which are then processed using a static image filter and stored for users to download them after being processed. The RESTful API is intentionally kept at a minimum.
There are 5 services altogether:
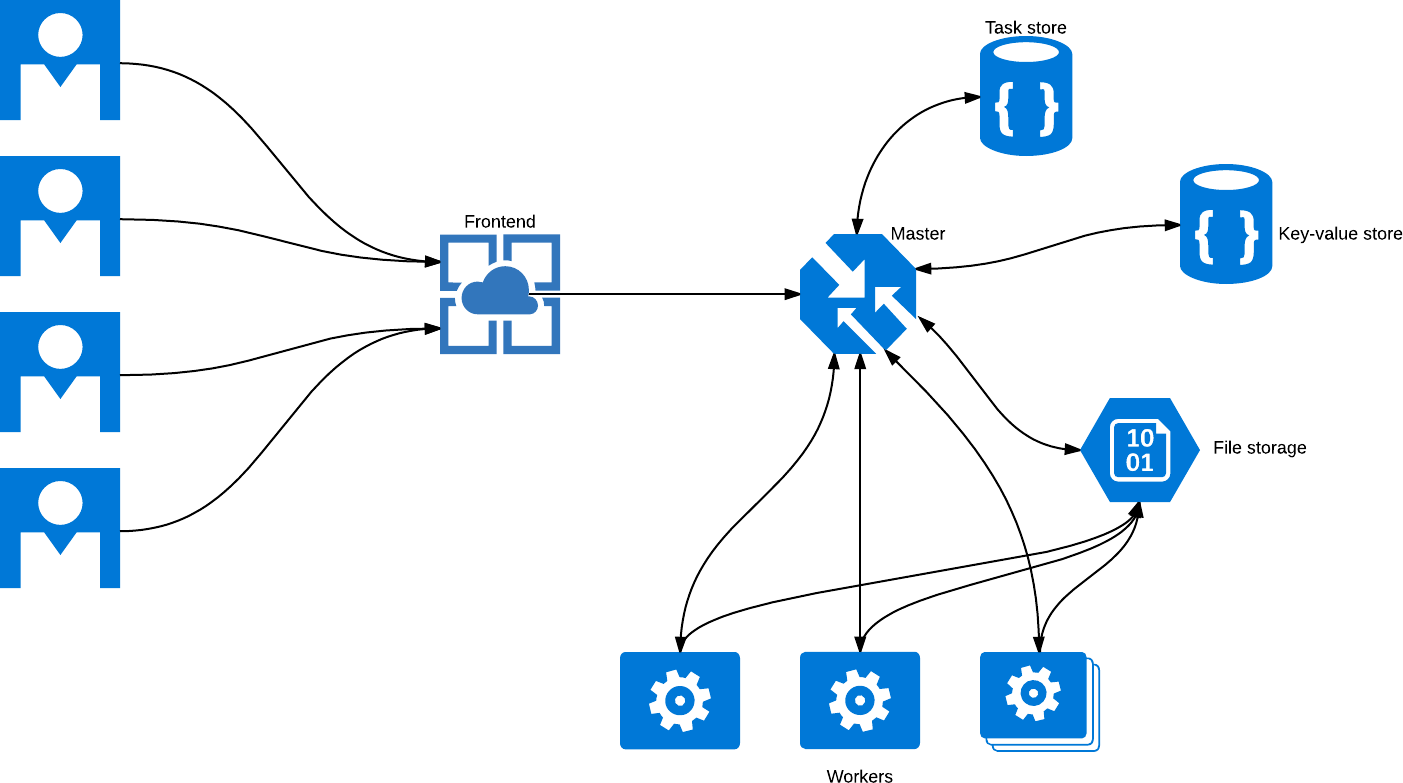
keyvaluestore.js: a central key-value store which is used by other services to register themselves and to query information about other services in the deployed systemdb.js: a simple database service storing information about the tasks to be handled by the workersstorage.js: file storage used to save images to be processed by the systemmaster.js: master service through which most of the other services operateworker.js: executor who is processing pending tasks by acquiring the image from the storage, transforming it and saving it back to the storage
Application Workflow
The workflow consists of two phases. During the first phase, the microservices are registered in the key-value storage. Each service will register its access point http://hostname:port from where other services will be able to look it up.
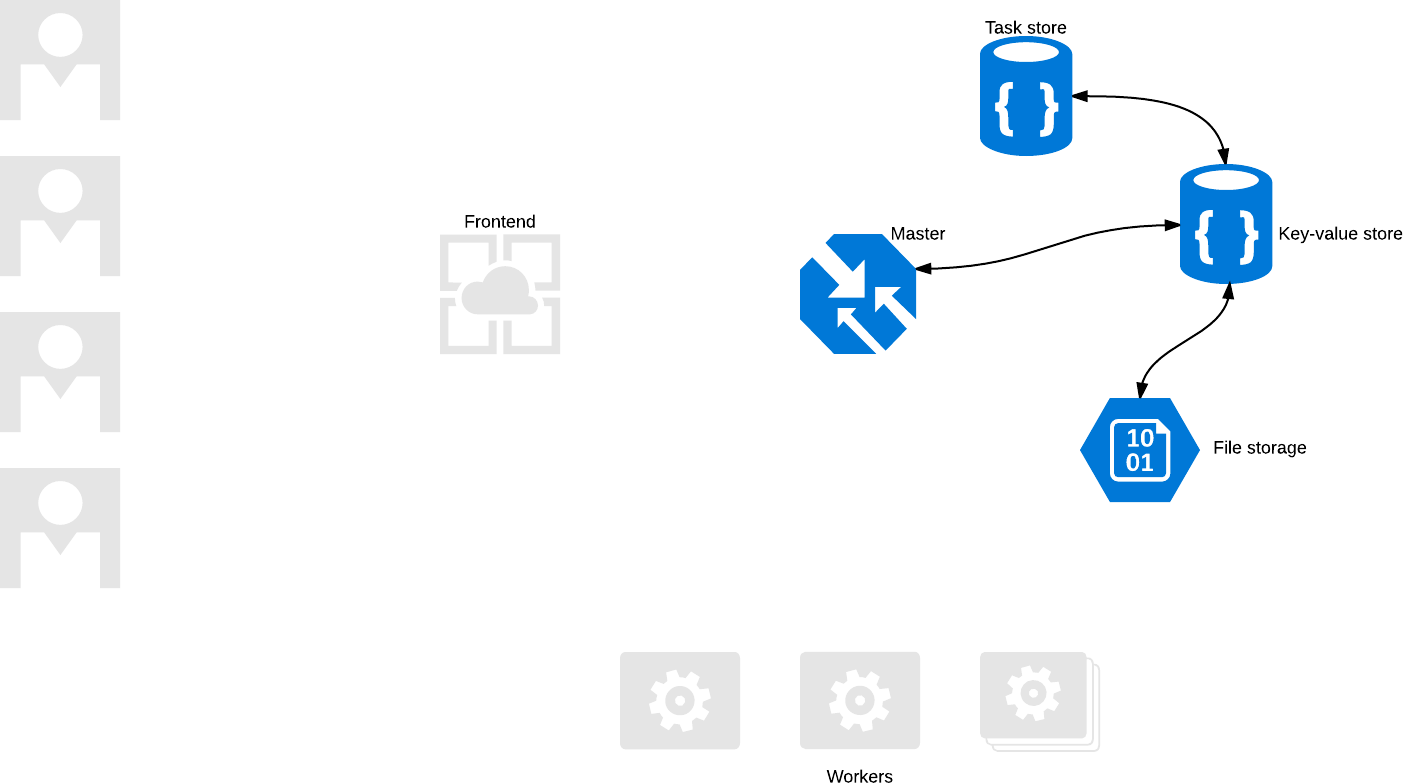
Once the services are registered, the application can be used. The collaboration between the services is depicted in the following diagram. This diagram introduces a frontend which is not part of this repository (it could be a web app using the backend API or just a simple curl).
Using the Application
Before you can use the Microservice Demo Application, ensure you have Node.js installed (version 4.4.5 was used for this tutorial). Navigate to the root directory of this project and install required packages:
$ npm install
This will download and install required packages inside node_modules subdirectory. You should now be able to launch individual services. Start with the central key-value store:
$ node keyvaluestore.js

server is listening on 8000
In separate terminals launch the remaining services:
$ node db.js localhost:8000

Database endpoint registered

Database is listening on 8001
$ node storage.js localhost:8000

Storage endpoint registered

Storage is listening on 8002
$ node master.js localhost:8000

Master endpoint registered

Master is listening on 8003
If done correctly, the key-value store should provide information about registered servives, e.g.:
dbendpoint=127.0.1.1:8001

storageendpoint=127.0.1.1:8002

masterendpoint=127.0.1.1:8003
Now try and upload one photo using the master node (check the above diagram to understand why we are uploading photos to the master service).
$ curl -X POST -F "image=@/path/to/photo.png" http://$MASTER_ENDPOINT/task
Now launch the worker:
$ node worker.js localhost:8000

Working on task 2

processing /home/lemmy/dev/mpm/node-micri/worker/2.png

done

Nothing to do at the moment
To upload more photos at the same time, you can use the accompanied script bin/upload_batch.sh:
$ ./bin/upload_batch.sh localhost:8000 /path/to/photo.png 20
This will:
- query the key-value store at
localhost:8000to get the endpoint of the master - upload the photo at given path
/path/to/photo.png20 times
Now start your worker again:
$ node worker.js localhost:8000

Working on task 3

processing /home/lemmy/dev/mpm/node-micri/worker/3.png

done

Working on task 4

processing /home/lemmy/dev/mpm/node-micri/worker/4.png

done

Working on task 5

processing /home/lemmy/dev/mpm/node-micri/worker/5.png

done

Working on task 6
You can start as many workers as necessary. In case a task is not finished by a certain timeout, another worker will try to process it again. This allows you to stop the workers without the risk to lose or miss a task. Feel free to upload new and new photos to the app.
Stay tuned for the other two parts of this blog series. For the impatient, we have made the tutorial available at the demo application’s GitHub project page.
Related posts


Pingback: The Microservice Demo Application (Running Inside OSv Unikernels Locally) - Mikelangelo - Horizon 2020 Project on Virtualization, Cloud Computing, and HPC()
Pingback: The Microservice Demo Application (Running Inside OSv Unikernels On Kubernetes) - Mikelangelo - Horizon 2020 Project on Virtualization, Cloud Computing, and HPC()
Pingback: newtube sirius244 abdu23na2473 abdu23na1()