The Art of Preparing OSv Packages
This post is the last in series of Microservice Demo Application posts. If you haven’t already, you can check first two parts below:
This last part of Microservice Demo Application blog series introduces you to running the application on Kubernetes, still using OSv unikernels. Virtlet runtime is employed to run virtual machines (unikernels) on Kubernetes where Docker containers are usually used.
Introduction
Application osv-microservice-demo serves for demonstration purposes of the improvements made to OSv and Capstan in the MIKELANGELO project. OSv is an operating system designed specifically for lightweight cloud workloads. It’s been developed initially by Cloudius Systems, now ScyllaDB. Capstan is a tool for rapidly composing applications into self-contained virtual machines ready to be deployed to various virtual machine monitors.
Deploying Unikernels on Kubernetes
You can deploy osv-microservice-demo application on Kubernetes with ease. If you don’t have a working Kubernetes cluster up-and-running with Virtlet plugin installed, please follow instructions from here. Below please find steps that we took to setup such environment on Ubuntu 16.04 machine.
Setup local Kubernetes cluster (with Virtlet runtime) on Ubuntu 16.04
Install Docker engine and kubectl client program that will be used to manage Kubernetes cluster:
$ curl -s https://packages.cloud.google.com/apt/doc/apt-key.gpg | apt-key add -

$ sudo cat <<EOF >/etc/apt/sources.list.d/kubernetes.list

deb http://apt.kubernetes.io/ kubernetes-xenial main

EOF

$ apt-get update

$ apt-get install -y kubectl docker-engine

$ sudo usermod -aG docker $(whoami) # log-out and log-in afterwards
Configure and run fake Kubernetes cluster:
$ git clone https://github.com/Mirantis/virtlet.git

$ cd virtlet/deploy

$ ./demo.sh

// takes a few minutes to complete
The script above takes quite some time since it sets up a whole DIND Kubernetes cluster on your local machine. When it finishes, you can (optionally) boot up Kubernetes GUI server:
$ kubectl proxy

# then visit http://localhost:8001/ui to browse Kubernetes UI
Test if everything works:
$ kubectl get pods --namespace kube-system

NAME                                    READY     STATUS    RESTARTS   AGE

etcd-kube-master                        1/1       Running   1          4h

image-server-1782580915-zv2w3           1/1       Running   0          4h

kube-apiserver-kube-master              1/1       Running   1          4h

kube-controller-manager-kube-master     1/1       Running   0          4h

kube-dns-3946503078-zplxw               3/3       Running   0          4h

kube-proxy-3r4p3                        1/1       Running   0          4h

kube-proxy-qck08                        1/1       Running   0          4h

kube-proxy-sw8rm                        1/1       Running   0          4h

kube-scheduler-kube-master              1/1       Running   1          4h

kubernetes-dashboard-2396447444-hn0jr   1/1       Running   0          4h

virtlet-8glgr                           1/1       Running   0          4h
Notice the image-server-1782580915-zv2w3 here since we will be uploading OSv images to it. The imageserver pod is nothing but an Nginx server serving unikernel images. We only use it to make those images accessible from withing Kubernetes network. If you have unikernel images accessible within some public server, then you won’t need imageserver at all.
Deploy microservices
To deploy the osv-microservice-demo application you need to:
- compose OSv unikernels
- upload OSv unikernels to the imageserver
- create k8s Services and Deployments
Compose and Upload
Our previous post describes how to prepare application to run it locally using OSv unikernels. Similar steps need to be taken when composing them to run on Kubernetes, and luckily there is a script to automate it (replace imageserver pod ID to match your environment):
$ npm install

$ ./virtlet_deploy/compose-and-upload-images.sh image-server-1782580915-zv2w3
Script compose-and-upload-images.sh first composes unikernel for each service and sets appropriate boot command for it. Then it uploads the unikernel to the imageserver. When the script finishes, your Kubernetes cluster is ready to actually boot unikernels.
Create k8s Services and Deployments
There are two yaml files given in virtlet_deploy folder: micro-services.yaml defines k8s Services for our application while micro-deployments defines k8s Deployments. The former is responsible for microservices to be addressable by name (regardelss the actual IP), while the latter specify what unikernels to deploy and how many. Go ahead, deploy osv-microservice-demo application:
// Deploy k8s Service definitions for osv-microservice-demo

$ kubectl create -f ./virtlet_deploy/micro-services.yaml

// Deploy k8s Deployment definitions for osv-microservice-demo

$ kubectl create -f ./virtlet_deploy/micro-deployments.yaml
Build Frontend Container
One can deploy frontend in Docker container by following this guide.
Result
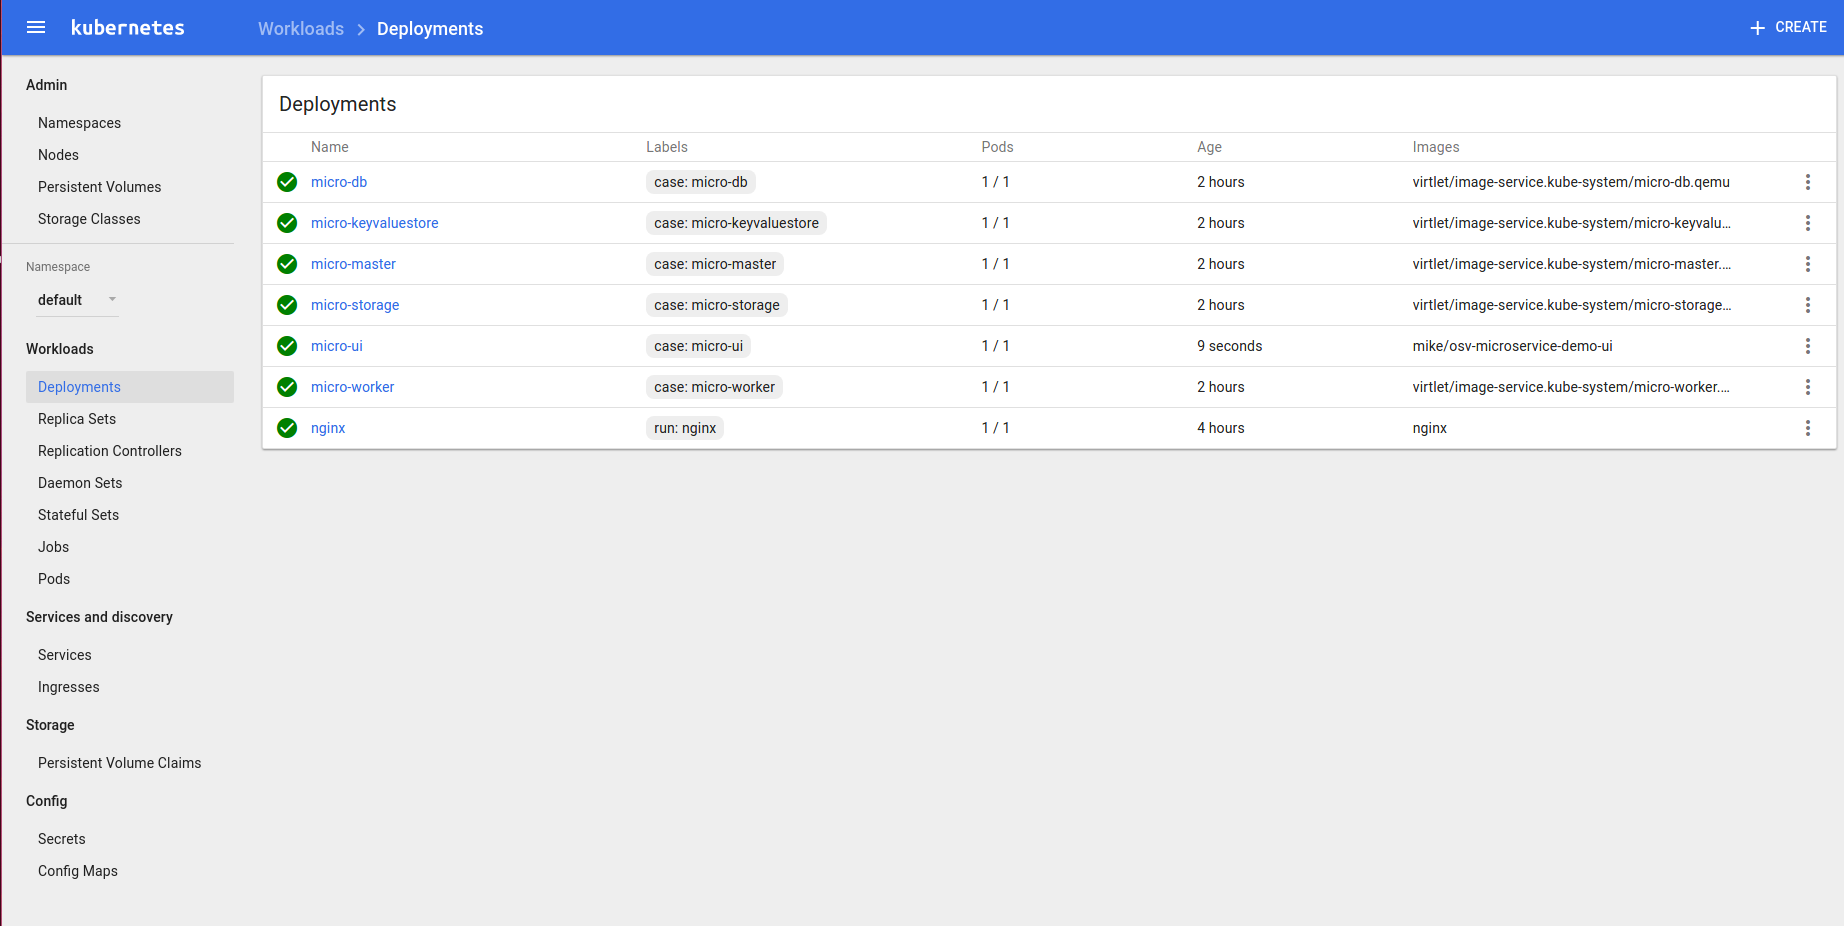
If everything went OK you should see something like this on Kubernetes GUI at http://localhost:8001/ui (replace localhost with appropriate IP in case you’re not running local cluster):
If you prefer CLI:
$ kubectl get pods

NAME                                  READY     STATUS    RESTARTS   AGE

micro-db-2179323451-23zml             1/1       Running   0          6m

micro-keyvaluestore-147712366-b5sfl   1/1       Running   0          6m

micro-master-1491918165-wzwff         1/1       Running   0          6m

micro-storage-1856298744-zfvf9        1/1       Running   0          6m

micro-ui-280641514-rbl0k              1/1       Running   0          5m

micro-worker-1113504003-pkq8k         1/1       Running   0          6m

nginx-158599303-h2kxd                 1/1       Running   0          9m
Wooohoo, everything seems to be up-and-running! To start using application just query the micro-ui pod IP using Kubernetes dashboard:
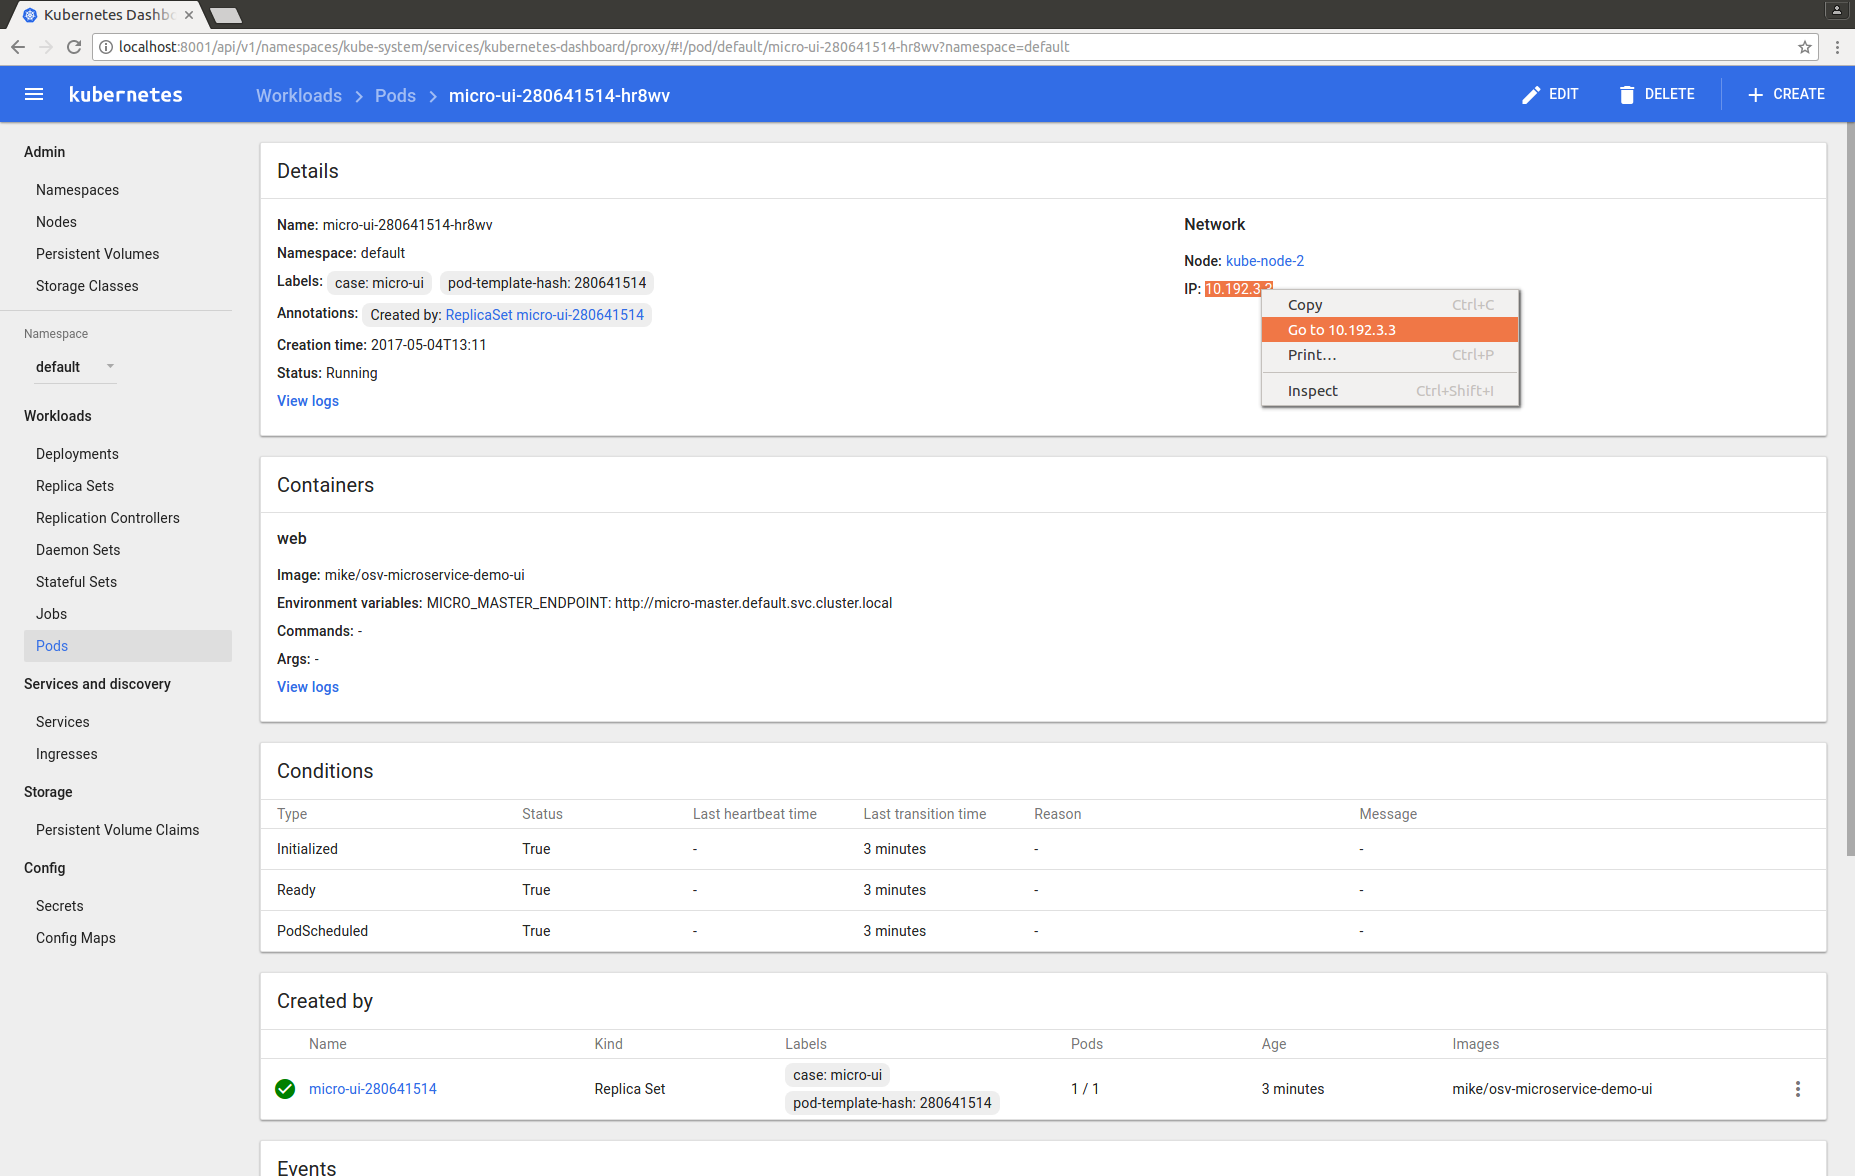
Or from CLI:
$ kubectl describe pod micro-ui-280641514-rbl0k | grep IP

IP:        10.192.3.3
There you go! Visit UI and start using osv-microservice-demo application!
Scale Workers
If you need more workers to process your images, you just need to perform two clicks on the Kubernetes GUI:
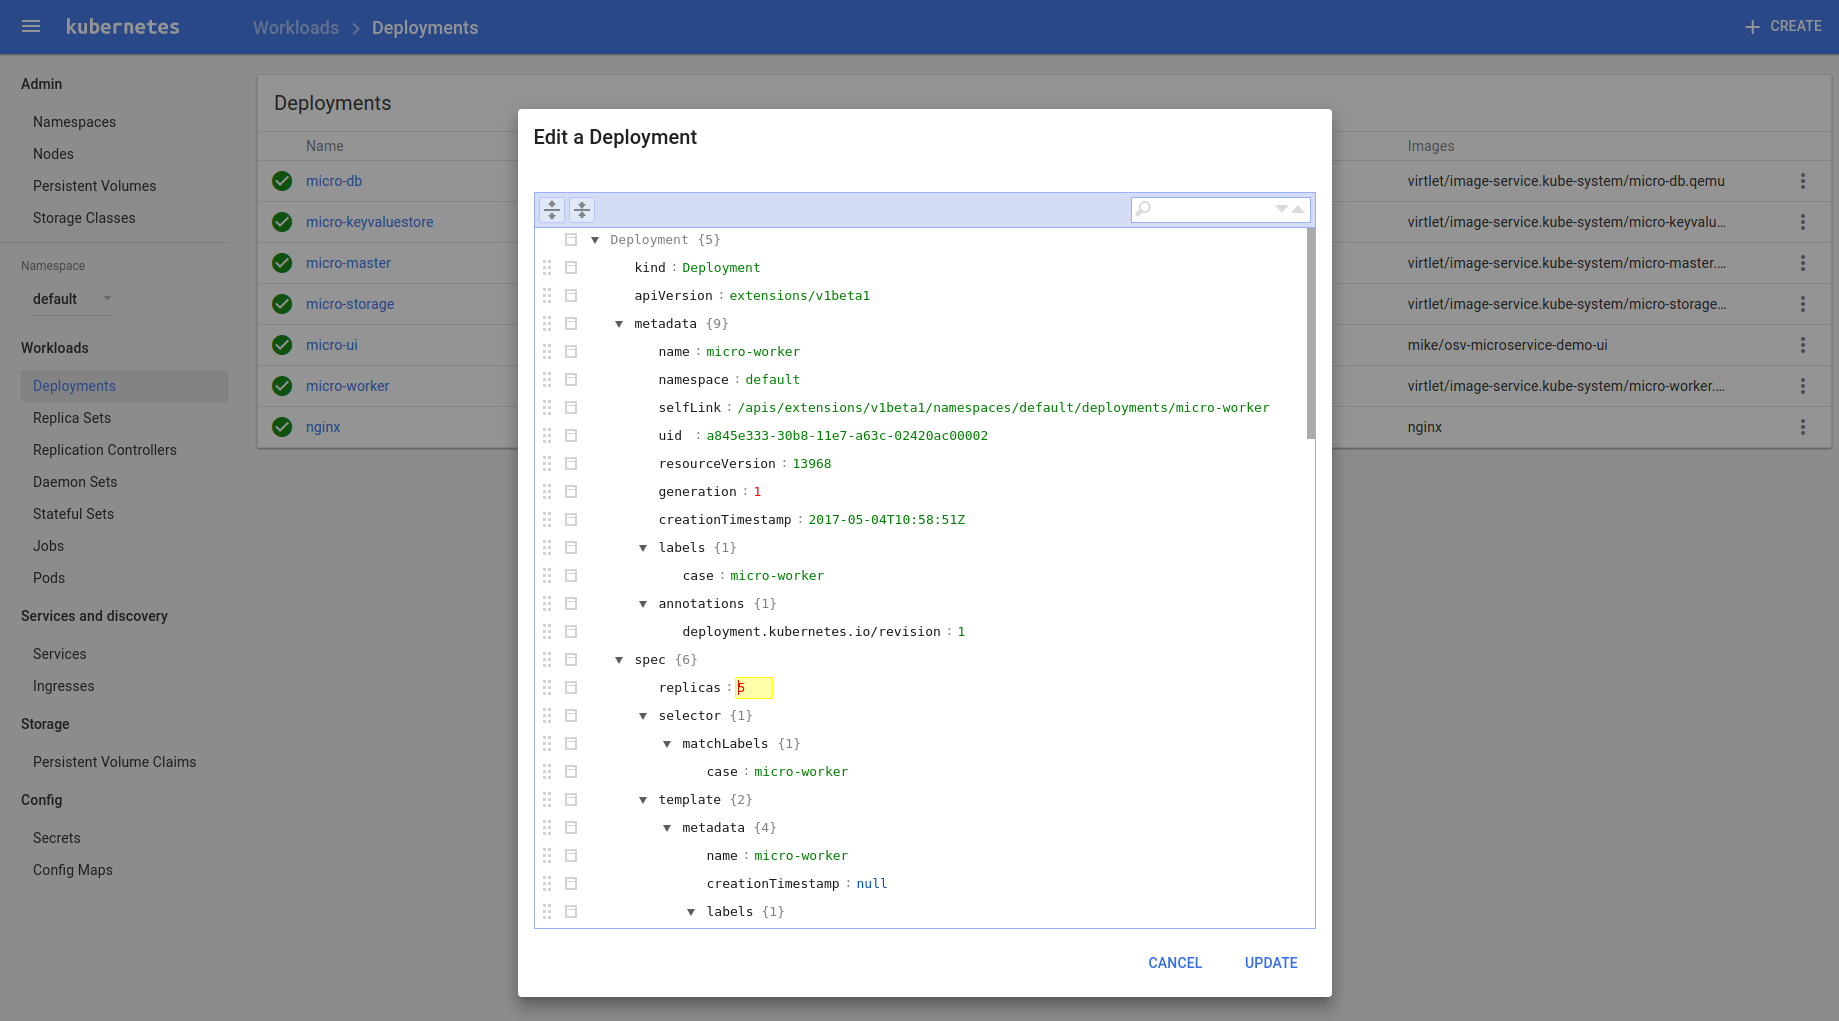
Or from CLI:
$ kubectl scale deployment micro-worker --replicas=5

deployment "micro-worker" scaled
The following video demonstrates the steps described in this post:
You are most welcome to visit GitHub project page and play with the source code.
Related posts


