Why to Combine Vagrant and Docker

Source: NASA
In this article we will boost your development cycle to create Dockerfiles with Vagrant.
If you’re into DevOps and you don’t use Vagrant yet, you should try it. In the Google Trends chart below you can see that it’s still gaining popularity. Vagrant provides a virtual development environment on your laptop. Each developer gets to use the same development environment without a tedious installation procedure. With Vagrant alone you can speed up your development cycle a lot!
Docker is another technology you should know. The Google Trends chart below shows how also docker is rising in popularity. Docker allows you to deploy and manage services easily on your server. It boosts your productivity by making service management a breeze.
In this article you will learn to combine the benefits of Vagrant and docker. Although docker offers many great features, working on Dockerfiles in a team may get tricky. Either you share a common development environment, for example on a server, or everybody gets their own development environment. With a shared environment it’s easy to break the system and block your teammates. With individual environments you have a high overhead for setup and maintenance. Even worse, separate environments often lead to the “but-it-works-on-my-machine” phenomenon. Vagrant resolves these issues by providing a framework for individual albeit identical development environments. By combining Vagrant with docker you can build new services within minutes.
How to Combine Vagrant with Docker
Step 1: Get Our Code
Our integration of Vagrant and docker goes beyond using docker as backend for Vagrant. We provide extra configuration and code to speed up your development cycle with docker. First, open a terminal and navigate to a folder where you would like to store the development environment. For example, we use ~/dev/. In your development folder clone our repo on GitHub:
git clone https://github.com/gwdg/vagrant-docker.git
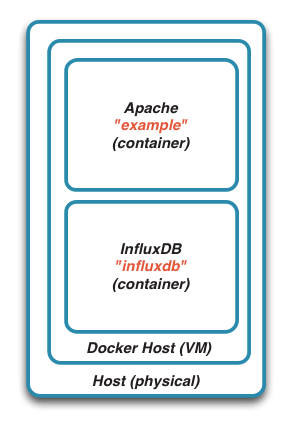
Deploying containers in a VM on a host.
The folder “docker” contains your docker projects. Initially, there is only a project called “example”, which starts a web server on port 8080.
Step 2: Create Your Own Docker Project.
In “docker” create a new docker project and add two empty files called “Dockerfile” and “Dockerenv” like this
cd docker mkdir influxdb touch influxdb/Dockerfile touch influxdb/Dockerenv
FROM tutum/influxdb MAINTAINER Peter Chronz <[email protected]>
Step 3: Build and Run Your Container
Now that we have set up a basic docker project, we will build the image and run it in a container. First, navigate to “vagrant-docker”, then check for the system status.
cd .. vagrant status
vagrant up
Step 4: Re-work
To recap, Vagrant and docker have build and deployed our InfluxDB container. To use the container, however, we need to configure the routing first. In specific, we need to forward port 8083, for the web interface, and port 8086, for the RESTful interface. The ports need to be forwarded from the container via the docker host to your physical host. The diagram below shows the whole setup, including the port assignments.
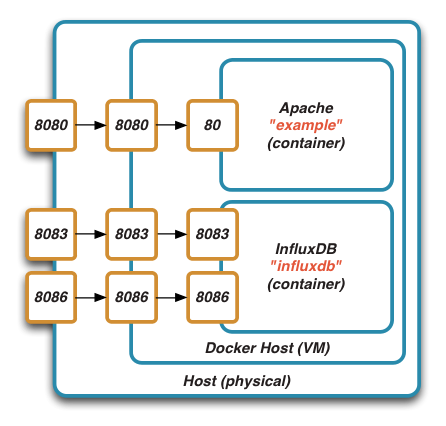
Deployment of docker containers in Vagrant with port forwarding
The host runs vagrant and with it the virtual machine that contains the docker host. The docker host contains two containers: “example”, with the web server, and “influxdb”. The diagram also shows how we are going to set up the port forwarding. The containers’ Dockerfiles expose certain ports to the docker host. For the web server you can verify this in docker/example/Dockerfile, where it says “EXPOSE 80”. Our Dockerfile for InfluxDB doesn’t expose the ports explicitly. However, our image uses the image tutum/influxdb as basis. This base image already exposes ports 8083 and 8086. You can verify this on the image’s page on Docker Hub. In the middle layer the docker host binds the container port to its interface, which is the virtual machine’s virtual interface. Normally you would provide the information to bind the container port to a certain docker-host port via a parameter in the command “docker run”. Since Vagrant issues this command instead of us, we need to tell Vagrant how to set the parameters. For the web server this happens in the file example/influxdb/Dockerenv. For InfluxDB you’ll get to write the configuration soon. The outermost layer in our diagram relates to the host. To tell the host which ports of the docker hostto bind to, edit the Vagrantfile in docker-host. Additionally, make sure that your host’s firewall does not block communication between the host and the virtual machine. In the innermost layer we want to expose ports 8083 and 8086. Since the Dockerfile for InfluxDB already exposes these ports, we need not make any changes here. In the middle layer we need to bind the container’s ports. To bind ports 8083 and 8086 on the docker host, add the following lines in YAML notation to the Dockerenv in docker/influxdb/:
ports: - "8083:8083" - "8086:8086"
Vagrant.configure("2") do |config| config.vm.hostname = "gwdg-docker-host" config.vm.box_check_update = false config.ssh.password = "tcuser" config.ssh.insert_key = true config.vm.box = "hashicorp/boot2docker" config.vm.network "forwarded_port", guest: 8080, host: 8080 config.vm.network "forwarded_port", guest: 8083, host: 8083 config.vm.network "forwarded_port", guest: 8086, host: 8086 end
Step 5: Rinse-repeat
Go through the process of changing the configuration and reloading until you’re satisfied with your image. Once you’re done you can push your results using your favourite versioning tool. If you use git you can create your own repos inside the “docker” folder. The “.gitignore” file ensures that you can manage your own repositories in “docker”.
What to Do Now?
Related posts


